Dealing with roof damage is never a pleasant experience. If you’ve recently faced a storm, fallen debris, or an unforeseen accident causing damage to your roof, one thing is likely on your mind: your insurance claim. Navigating the process of roof insurance claims may seem overwhelming, but understanding the steps involved can ease stress and ensure you’re fairly compensated.
This guide breaks down the process into actionable steps to help homeowners like you successfully handle roof insurance claims. Here’s what you need to know.
Step 1: Document the Damage
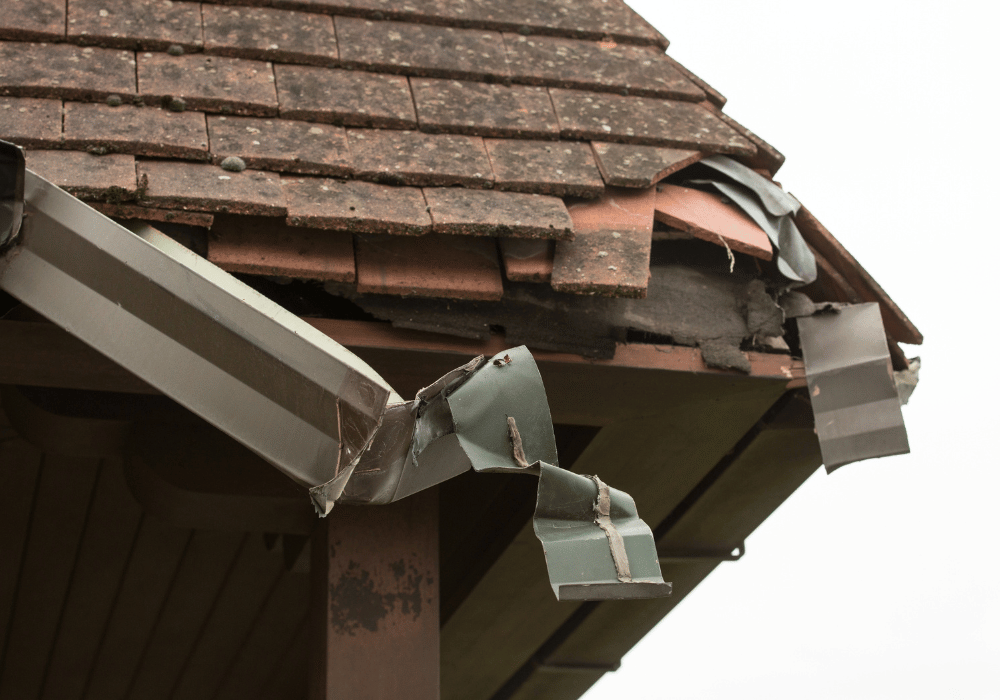
The first step in the roof insurance claims process is documenting the damage thoroughly and promptly. Having clear evidence of the damage will strengthen your claim and speed up the process.
Take high-resolution photos and videos of the affected areas, covering every detail. Focus on visible damage like missing shingles, cracks, leaks, or dents. Ensure you also capture views from multiple angles. Alongside these, take note of any supporting details, such as the date and cause of the damage (e.g., hailstorm or fallen tree branches).
If the damage isn’t immediately visible because of its location, consider using a drone to get a clear view. Alternatively, hire a professional roofer to certify the damage and include this documentation for added credibility.
Tip: Keep any damaged objects or debris that may be relevant, as they provide physical proof of what caused the problem.
Step 2: Contact Your Insurance Company
Once you have solid evidence, contact your insurance company immediately. Reporting the damage and starting a claim early is vital, as many insurance policies have deadlines for filing claims. Waiting too long could lead to delays or, worse, denial of your claim.
Start the process by calling your insurer’s claims department or submitting your claim through their online portal, if available. When filing the report:
- Provide details about the date and cause of the damage.
- Share the documentation you’ve gathered, including videos, photos, and notes.
- Take the time to ask about coverage specifics, including deductibles and exclusions.
Make sure to take down the claim reference number your insurer provides. You’ll need this for future communications.
Pro tip: Request a copy of your insurance policy. Review it to understand what roof damages are covered, including whether you’ll be compensated for full roof replacement or only repairs.
Step 3: Schedule a Roof Inspection
Once you’ve filed the claim, your insurance company will typically send out an adjuster to inspect the damage. This inspection is a critical step, as the adjuster’s report plays a major role in determining the compensation amount.
Preparation is key here. Arrange for your own trusted roofing contractor to attend the inspection alongside the adjuster. This ensures a balanced assessment of the damage and prevents the adjuster from underestimating repair costs.
During the inspection:
- Be present to answer the adjuster’s questions.
- Share the evidence (photos, videos, notes) you collected earlier.
- Highlight any details the adjuster might overlook.
Your contractor can provide a professional second opinion regarding the extent of the damage and whether it warrants repairs or a full replacement.
Step 4: Review the Insurance Estimate

After the inspection, your insurance company will issue a claim estimate. This document outlines the scope of the damage, recommended repairs or replacements, and the associated costs.
Take the time to carefully review the estimate and ensure all damage has been accounted for. If something seems off or incomplete, don’t hesitate to request clarification or additional revisions. A transparent conversation with your insurer at this stage is vital.
If your contractor was present during the inspection, ask them to review the estimate, too. They may notice underreported or omitted damages. If discrepancies occur, your contractor can help you file a supplemental claim to request a revised estimate.
Tip: Keep in mind that the estimate may also outline your deductible. This is the out-of-pocket amount you’ll need to pay before your insurance coverage kicks in.
Step 5: Hire a Professional Roofing Contractor
Once you’ve reviewed and agreed on the insurance estimate, it’s time to select a roofing contractor to complete the work. Hiring the right contractor is crucial, as their workmanship directly impacts your home’s safety and value.
Follow these tips when selecting a contractor:
- Get quotes from multiple local contractors to compare prices and services.
- Check online reviews, references, and credentials to ensure they’re reputable.
- Ensure the contractor is licensed, insured, and experienced with insurance claims.
Some roofing contractors may even assist with insurance claim paperwork, making the process smoother for you. Once you’ve chosen a contractor, sign a detailed contract outlining the scope of work, timeline, and costs.
Caution: Be wary of storm-chasing contractors who offer quick fixes at suspiciously low prices. These can often lead to subpar repair work.
Step 6: Complete the Repairs
With your contractor hired, the repair or replacement of your roof begins. Stay involved throughout the process to avoid any surprises. Regularly check on the progress and maintain open communication with your contractor to ensure the work aligns with the agreed-upon plan.
Here’s what to keep in mind during the repair phase:
- Verify that the materials being used match what was specified in the contract.
- Take photos of the progress (some insurance companies may request them).
- Keep track of any unforeseen issues that may arise and report them immediately to your insurer.
Once the repairs are completed, inspect the final work with your contractor to ensure everything meets your satisfaction.
Step 7: Finalizing Your Roof Insurance Claim
The final step in the roof insurance claims process is submitting the necessary paperwork to finalize the claim. Your contractor will typically provide the invoice for the completed work, which you’ll need to send to your insurance company.
Upon receiving the paperwork, your insurer will process the final payment. If you had any out-of-pocket expenses that your policy covers, include those receipts as well.
Pro Tip: Ensure you maintain records of every communication, proof of payment, and documentation for future reference. These details could be helpful if you need to revisit the claim or file a new one later.
Managing a roof insurance claim doesn’t have to be overwhelming. By following these seven steps, you’ll be well-equipped to handle the process efficiently, from documenting the damage to completing the repairs.
Remember, preparation and communication are the keys to success. Keep detailed records, involve trustworthy professionals, and don’t hesitate to ask questions. With the right strategy, you can safeguard both your home and wallet.
If you’re currently navigating a roof insurance claim and have questions, reach out to a local professional or your insurer for guidance. A little extra preparation today can save you significant stress tomorrow.